A Step-by-Step Tutorial to Adding a Size Chart to Your Shopify Store for a Better Customer Experience 

Providing a size chart on your Shopify store can improve the overall customer experience and minimize the chances of returns and exchanges. In this step-by-step tutorial, we will guide you through how to add a sizing chart to your Shopify store, which will help you enhance your customer experience.
Marketing

Marketing

Last updated on July 24, 2023

In the competitive world of e-commerce, customer experience plays a vital role in the success of your Shopify store. One crucial aspect of customer experience is ensuring your customers can easily find the right product size they are looking to buy. The average rate of returns for online purchases was 20.8% in 2022, and 38% of people cited sizing issues as the main reason for returning the things they bought online. Providing a size chart on your Shopify store can improve the overall customer experience and minimize the chances of returns and exchanges. In this step-by-step tutorial, we will guide you through how to add a sizing chart to your Shopify store, which will help you enhance your customer experience.

A Shopify product page displaying accurate size charts reduces returns

 Before diving into the how, let us spend a brief moment on the first step, gathering accurate sizing information for your products. This information can be obtained from your suppliers and manufacturers or by measuring the products yourself. Ensure you include all relevant dimensions for each product you’re selling. It is important to have precise and comprehensive sizing details to give customers accurate guidance. For example, if you sell photo frames, you would know that it is common practice to include the length and breadth of the frame in your Shopify store. However, it may be advantageous to have depth as well. Doing so will void any confusion and give more clarity to your customers, and keeping them fully informed about the product adds to the overall customer experience. Another good practice is to ensure that your measurements are in the metrics that are standard practice in the country that you’re selling in, i.e., if you’re selling in the US, keep the unit of weight in pounds and the unit of length in inches or feet.

Now that we have established the importance of adding a sizing chart and how to go about sizing data, let us move on to learning how to create sizing charts. There are multiple ways to go about this, as listed below. 

      1. By adding a custom-size chart to your product page on Shopify with code 

      1. By adding sizing charts to your product page without code

      1. By adding sizing charts through an app

      1. By creating an image-based sizing chart to add to your images on the Shopify listing

    In this article, we will take you through all these, and you can decide what’s best for you. 

    1. Adding a custom-size chart to your product page on Shopify with code –

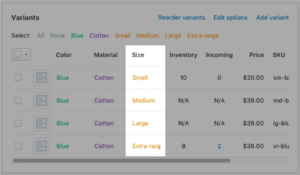
    For this, it is essential to note that all products that require reference to the size chart must have a Size option on the listing.

    Size option listing on Shopify

    You need to follow five steps when you want to add a custom-size chart to your product page on Shopify through this method.

    Step 1: Create a size chart page

    Step 2: Navigate to the code editor 

    Step 3: Create a size chart snippet

    Step 4: Add the size chart snippet to the theme.liquid file

    Step 5: Add a size chart button

    Step 1 – Creating a size chart page on your Shopify account

        1. If you’re doing it on the desktop from your Shopify admin, go to Online Store > Pages. Or, if you’re doing it on your app, From the Shopify app, tap Store. In the Sales Channel section, tap Online Store.

        1. Click Add page. 

        1. Enter a page title.

        1. If you want to create a size chart that appears site-wide, enter Size Chart for the page title. In the Search engine listing preview section, the page URL should end in /size-chart.
              1. If you want to create a chart that only appears on products from a specific vendor, enter the vendor’s name followed by the Size Chart. For example, if your vendor is Vendor X, enter Vendor X Size Chart for the page title. In the Search engine listing preview section, the page URL should end in /vendor-x-size-chart.

              1. If you want to create a chart that only appears on a specific product type, enter the product type followed by Size Chart. For example, if you display a size chart detailed to tops, enter Tops Size Chart for the page title. In the Search engine listing preview section, the page URL should end in /tops-size-chart.

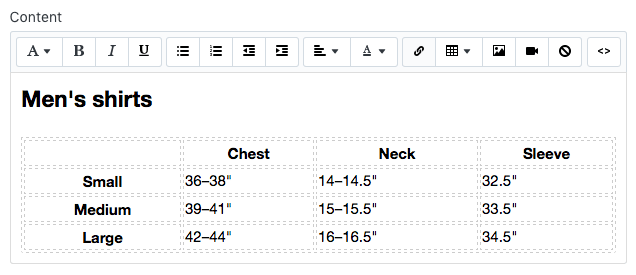
          1. In the Content box, create a table that contains your size chart information. Customize the table to look the way you want it to: 0DoRbH bxgc2XCIT4fe6gfCJL Hd34wKo2 lYx8HENXyRSVWDRqBfxi20KMCyNxFtbRRj5brBQ

          1. In the Visibility section, make sure the page is set to Visible.

          1. Click Save.

        Step 2: Navigating to the Code Editor

        Desktop

            1. From your Shopify admin, go to Online Store > Themes

            1. Find the theme you want to edit, click the button to open the actions menu, and click Edit code

          iPhone/Android

              1. From the Shopify app, tap Store.

              1. In the Sales channels section, tap Online Stor.

              1. Tap Manage themes

              1. Find the theme you want to edit, click the ... button to open the actions menu, and click Edit code.

            Step 3: Creating a Size Chart Snippet

                1. In the Snippets directory, click Add a new Snippet

                1. Name your snippet size-chart, and click Create snippetH74Yct17sM3DKCrU6qvIJ8H91kB9DAU28PM rpN7rxR4PdQ30cCa8zc0y9r 7yJ8wAyTJtrn4 9A6xY8mcswkCp7b7 5I1TuKh

                1. Copy the following into your size-chart snippet:

              <div class=”pop-up-modal”>

                <div class=”pop-up-content”>

                  <span class=”close-button”>&times;</span>

                  <span class=”size-chart-content”>{{ pages.size-chart.content }}</span>

                </div>

              </div>

              <script>

                const modal = document.querySelector(‘.pop-up-modal’);

                const trigger = document.querySelector(‘.trigger-pop-up’);

                const closeButton = document.querySelector(‘.close-button’);

                function toggleModal() {

                  modal.classList.toggle(‘show-pop-up’);

                }

                function windowOnClick(event) {

                  if (event.target === modal) {

                    toggleModal();

                  }

                }

                trigger.addEventListener(‘click’, toggleModal);

                closeButton.addEventListener(‘click’, toggleModal);

                window.addEventListener(‘click’, windowOnClick);

              </script>

              <style>

                .pop-up-modal {

                  position: fixed;

                  left: 0;

                  top: 0;

                  width: 100%;

                  height: 100%;

                  background-color: rgba(0, 0, 0, 0.5);

                  opacity: 0;

                  display: none;

                  transform: scale(1.1);

                  transition: visibility 0s linear 0.25s, opacity 0.25s 0s, transform 0.25s;

                  overflow:auto;

                }

                .pop-up-content {

                  position: absolute;

                  top: 8%;

                  left: 50%;

                  transform: translate(-50%, 0);

                  background-color: white;

                  padding: 1rem 1.5rem;

                  width: auto;

                  border-radius: 0.5rem;

                }

                .pop-up-content table {

                  table-layout: auto;

                }

                .close-button {

                  float: right;

                  width: 1.5rem;

                  line-height: 1.5rem;

                  text-align: center;

                  cursor: pointer;

                  border-radius: 0.25rem;

                  background-color: lightgray;

                }

                .close-button:hover {

                  background-color: darkgray;

                }

                .show-pop-up {

                  z-index: 12;

                  opacity: 1;

                  display: block;

                  transform: scale(1);

                  transition: visibility 0s linear 0s, opacity 0.25s 0s, transform 0.25s;

                }

                .trigger-pop-up {

                  margin: 10px 0 10px 0;

                  width: 100%;

                }

                @media only screen and (max-width: 749px) {

                  .pop-up-content,

                  .size-chart-content table {

                    width: 100%;

                  }

                  .size-chart-content th,

                  .size-chart-content td {

                    padding: 10px;

                  }

                }

              </style>

              Note – Some changes need to be made to the CSS styling for Simple and Minimal themes. You can find them here.

              Step 4: Adding the size chart snippet to your theme.liquid file

                  1. In the Layout directory, click to open your theme.liquid file.

                  1. Find the closing </body> tag. Right above the closing </body> tag, paste the following code:

                {% if request.page_type == ‘product’ %}

                    {% if product.options contains ‘Size’ %}

                        {% render ‘size-chart’ %}

                    {% endif %}

                {% endif %}

                Step 5: Adding a Size chart button

                    1. In the Sections directory, click to open your product-template.liquid file or product.liquid file if you do not have a product-template.liquid file.

                    1. Paste the following code above the Add to cart button:

                  {% if product.options contains ‘Size’ %}

                      <a class=”trigger-pop-up btn”>See Size Chart</a>

                  {% endif %}

                  The Add to cart button typically starts with something like <button type=”submit” name=”add”. If your store’s operating language isn’t English, replace See Size Chart with the text you prefer.

                  2. Adding a size chart to your product page on Shopify without code


                  There are two variations that you can get by using this method. One is a collapsible row where you can see a table and an image, and the other is a pop-up where you can display a table or an image. It is best practice to duplicate your theme before making any customizations. Once you’ve done that, follow the below steps to add a size chart. 

                  Option 1 – Collapsible row

                      1. Navigate to your product page and click on the product to which you want to add the size chart. 

                      1. Head to the product information section and click on Add block

                      1. To add a collapsible row, click Collapsible row to see it added to the bottom of your product information.

                      1. Now click and drag the collapsible row and place it under your buy buttons

                      1. Rename the heading as “Size chart”

                      1. You can also choose an icon for this collapsible row. The ruler is a relevant option.

                      1. You then have two options for the content. One is row content, which is simply text-based, and the other is row content from a page that allows you to display a table and/or an image. 

                      1. To add content from a page, you need to create a size chart page to add content from a page. 

                      1. Click Save before you go on to create a size chart page.

                      1. Now, go back to the Admin panel, and on the left, click on Pages. If you have different size charts for your products, you must create a page for each size chart.

                      1. On the top right, click on Add page

                      1. Add a suitable title

                      1. For the content, click on the table icon and click Insert table and build your size chart. When making your table make sure to add spaces above and below so that it will display correctly.

                      1. If your size chart is an image, click on the image icon to insert an image and then click Upload file to add your image. For the size, choose 600 pixels (this will be enough to display your image correctly), and lastly, click insert image and click Save.

                      1. Go back to the customizer, click on Select page, and select the page you just created. 

                      1. Click on Save

                      1. Now you should be able to see your size chart under the collapsible row that we created. 

                    Option 2 – Pop-up

                        1. Navigate to your product page and click on the product to which you want to add the size chart.

                        1. Head to the product information section and click on Add block

                        1. Click Pop-up

                        1. Change the link label to “Size chart”

                        1. Connect your page through the dynamic source

                        1. Click Save

                      3. Adding Size charts through an app

                      This method comes with some advantages. Firstly, coding is unnecessary when you add a size chart via an app. Secondly, most importantly, sophisticated apps like Kiwi Sizing may offer easy-to-use fit recommenders that let shoppers know the best size to purchase using machine-learning methods. Below are the steps to install a size chart from Kiwi, but similar instructions apply to any app you use. 

                        1. Go to the Shopify app store, search Kiwi Sizing, and click Add app to install the app

                        1. Once you’ve installed it, open the Kiwi app from the Apps tab

                        1. Click on Add New Size Chart button in the top right corner

                        1. Choose from the options available. The common ones include starting with an empty size chart, importing a table from a product description, and importing a table from a CSV file. This article will discuss the first one, starting with an empty-size chart.

                        1. Once you click on Start with an empty chart, name the size chart. The name you enter will not be visible externally, so feel free to choose a name that is easy to remember

                        1. Toggle the Publish the size chart button 

                        1. Customize the Size Chart layout as suitable. You could add additional rows and columns in the Advanced Mode on the right-hand side 

                        1. You can select a unit from the table, and it will automatically provide you with a unit conversion

                        1. Once you fill in the details, click Save

                        1. You can add blocks of text, images, separators, and other elements to your size chart layout and customize how you want it to look

                        1. You have the option to open the size chart in a new window, but for a better customer experience, we would recommend you don’t do that

                        1. Once you’ve designed the layout for your size chart, Scroll down to Product matching conditions and select the products or product types you want to show this size chart on

                        1. Click Save

                        1. Click on Online Store under Sales Channels to go to the online store

                        1. Select a product, click on Size Chart, and you should see the size chart you created in seconds

                      4. Creating an image-based sizing chart to add to your images on the Shopify listing

                      Visual charts are always more appealing than others. Wherever possible, our recommendation would be to add image-based sizing charts. You can add it whether you’re using an app or via just one of your images. Most customers go through all the images in a product listing while looking to buy something. Therefore, including your sizing chart as one of the images would add to the overall customer experience. Not to forget, visual information makes it easier for your customers to understand the sizing information better. You can use graphic design software like Adobe Photoshop or online tools like Canva to create visually appealing sizing charts and save the sizing chart image in a widely supported format like JPEG or PNG. Include clear labels and use contrasting colors to ensure the text is legible. It’s helpful to divide the chart into sections for different product categories. For example, if you sell apparel, you would have categories such as tops, bottoms, and accessories. 

                      After completing the above steps, take the time to test the sizing chart on your Shopify store thoroughly. If you’re adding an image size chart, ensure the image displays correctly, the links are working, and the information provided is accurate. If you’re adding a custom sizing chart on Shopify, test the sizing chart across different devices and browsers to ensure a consistent customer experience. Ask friends or colleagues to test the functionality from a customer’s perspective and gather feedback. Use this feedback to make any necessary improvements and optimize the sizing chart experience for your customers.

                      Adding a sizing chart to your Shopify store can significantly improve the customer experience while reducing returns. A well-designed and easily accessible sizing chart allows customers to make informed purchasing decisions, reducing the likelihood of returns or exchanges due to sizing issues. We hope the step-by-step tutorial outlined above helps you integrate a sizing chart into your Shopify store, ultimately leading to happier customers, improved sales, and a competitive edge in the e-commerce market. 

                      In this article

                      Personalized Size Recommendations
                      on your Shopify Stores

                      Dramatically reduce returns and increase sales with Kiwi

                      0 M+
                      Size Charts
                      0 K+
                      Active Stores
                      0 mins
                      Average Creation Time
                      kiwi-logo-shadow

                      Personalized Size Recommendations on your Shopify Stores